

Do your photos look blurry? Does the camera miss the right spot? Auto mode is fast. But it can make big mistakes. It can get confused in the dark. It might lock on the wrong thing. This is a common problem. You can fix this fast. You need to know what is manual focus. This mode puts you in charge. We will show you how to use it. You will learn how to get clear shots. You will learn to use this mode on phones. You will learn to use it on big cameras. Let us fix those blurry shots right now.
Quick Answer
What is manual focus? It is a basic camera mode. You take full control of the lens. You turn the focus ring by hand. The camera does not choose the sharp spot. You decide what part of the picture is sharp. This is best for dark scenes and macro shots.
What Is Manual Focus in Photography?
In the past, all cameras used this mode. There was no auto mode. You had to use your hands. You had to look through the glass. You had to spin a ring on the lens. This moves the glass parts inside. You stop turning when the shot looks clear.
Today, cameras have smart chips. They do the work for you. But the old way is still very useful. What is manual focus in photography today? It is your backup plan. It is a tool for art. It lets you break the rules. You can make the background blur. You can keep the front sharp. You take total control of the light.
Also See: Best Manual Focus Camera Android: 5 Top Picks
Why You Should Use This Mode
Auto mode is great for sports. It is great for fast action. But it fails in some cases. You should use the hand mode in these times.
1. Shooting in the Dark
Cameras need light to see. They look for contrast to lock on. In a dark room, they get lost. The lens will hunt back and forth. It makes a whirring noise. It never locks on. You must step in. Turn the switch. Spin the ring yourself.
2. Taking Macro Shots
Macro means very close. You might shoot a bug. You might shoot a flower. Small things are hard to track. A tiny breeze moves the flower. The auto mode will lose the spot. You must do it by hand.
3. Taking Night Sky Photos
Do you want to shoot stars? Auto mode cannot see stars at all. The sky is too dark. You must set the lens to infinity. You do this by hand. This makes the stars look like sharp dots.
4. Filming Video Clips
Video needs smooth shifts. Auto mode can jerk the lens fast. This looks bad on screen. Doing it by hand is smooth. You can slowly shift from one face to the next.
How to Use Manual Focus Lens
It is very easy to learn. You do not need to be a pro. Just follow these simple steps.
-
Find the switch: Look at the side of your lens.
-
Flick the switch: Move it from AF to MF.
-
Look in the hole: Put your eye to the camera.
-
Find the ring: Grab the front ring on the lens.
-
Turn it slow: Spin the ring left or right.
-
Watch the screen: See how the blur changes.
-
Stop turning: Stop when your subject is very sharp.
-
Take the shot: Press the top button down.
Expert Tip:
Always use a tripod for the best results. If you hold the camera, your hands will shake. Even a tiny move will ruin the sharp lines. Keep the gear still. Use the screen zoom tool to check the fine details before you press the button.
Brand Guide: Canon and Nikon
Many new buyers ask how to use manual focus on Canon. It is quite simple. Look at your Canon lens barrel. You will see a small switch. It says AF and MF. Slide the switch to MF. Now turn the front ring. Watch the back screen. You can turn on a tool called focus peaking. This puts a red or blue color on sharp edges. It makes the job very fast.
You can read the Canon official lens support page to learn more about your specific gear. They show how each lens ring moves.
What about Nikon users? What is manual focus nikon style? It works the exact same way. Some Nikon lenses have a switch that says M/A and M. Choose the M side. Then spin the front ring. Both brands offer a digital zoom on the back screen. Press the zoom button with the plus sign. Look very close at your subject. Make the edges perfect.
Using Old Film Cameras
How to manual focus film camera? Old film gear is very fun to use. It works in a neat way. These cameras have a split circle in the middle of the view. You look through the top hole. You will see two broken halves of the image.
You must turn the lens ring. This moves the two halves. Make the two halves join together. The lines will match up perfectly. When the lines match, the shot is sharp. It is a great way to learn. It trains your eyes to see fine details.
Using This Mode on Phones
You do not need a big camera to do this. Your phone can do it too.
Apple Phones
Do you want a manual focus iPhone trick? Open the basic camera app. Point the phone at a subject. Tap the screen on that spot. Hold your finger down for a long time. A yellow box will blink. It will say AE/AF Lock. Now the sharp spot stays put. You can move the phone. The lens will not hunt. You can also slide the sun icon to change the brightness.
Android Phones
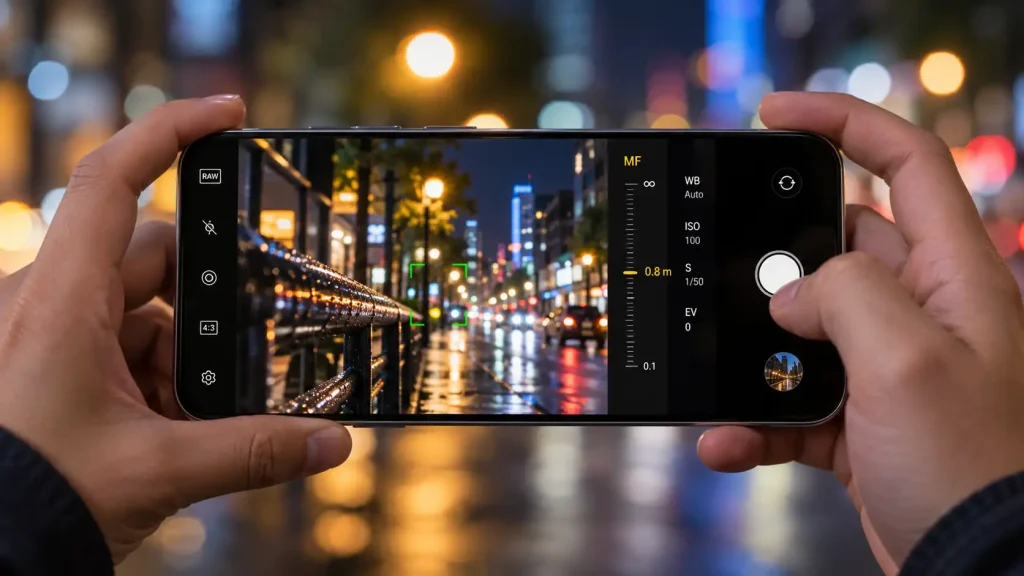
Need a manual focus camera Android tip? Open your main camera app. Look at the bottom menu. Find the word Pro or Manual. Tap it. You will see a lot of sliders. Look for the MF slider. Slide your finger left or right on the screen. The screen will show you what is sharp. It often highlights the sharp parts in green.
Third-Party Apps
What if your phone lacks a Pro mode? You might ask, what is manual focus app? It is an app you buy from the store. Apps like Halide or ProCam are great. They give you a real MF slider on the screen. They turn your phone into a real pro tool. Phone sensors are small. But the DxOMark camera sensor testing methodology shows that good apps help phone lenses act like big tools. They squeeze out every drop of quality.
Helpful Tools for Sharp Shots
You do not have to rely on your bare eyes. Modern cameras give you great tools to help.
Focus Peaking
This is the best tool. It is on most new cameras. It finds the sharp edges in your frame. It paints those edges with a bright color. You can choose red, yellow, or blue. When the subject turns red, you know it is sharp. You press the button.
Digital Zoom
Do not trust the full screen view. It is too small. Press the zoom button on your camera. Zoom in five or ten times. Look at the eye of your subject. Turn the ring until the eyelashes are clear. Then zoom back out. Take the shot.
The Diopter Dial
Look next to the eye hole on your camera. You will see a tiny wheel. This is the diopter. It is like glasses for your camera. If your eyes are bad, you must spin this wheel. Spin it until the text in the screen looks crisp. If this dial is wrong, your shots will always be soft.
Helpful Comparison: Auto vs Manual
Here is a simple table to help you choose the right mode.
| Feature | Auto Focus (AF) | Manual Focus (MF) |
| Best For | Sports, kids, pets, fast action | Macro, stars, dark rooms, video clips |
| Speed | Very fast | Slow and careful |
| Ease of Use | The camera does it all | You must turn the ring yourself |
| Accuracy | Good in bright daylight | Perfect when you use the screen zoom |
| Low Light | Fails and hunts a lot | Works great if you have a light source |
Common Mistakes Camera Buyers Should Avoid
Many new buyers make the same errors. Do not make these simple mistakes.
-
Forgetting to switch back: You leave the lens on MF mode. You go to a party the next day. You try to snap a fast shot. The camera will not focus. You miss the shot. Always switch back to AF when you are done.
-
Moving your body: You set the ring perfectly. Then you lean forward a tiny bit. The shot gets blurry. You must stand completely still.
-
Trusting bare eyes: You look at the small screen. It looks sharp to you. You go home. You view it on a big PC monitor. It is very soft. Always zoom in to check the fine details before you shoot.
-
Forcing the stiff ring: The lens is set to AF mode. You try to turn the front ring by force. This is bad. This can break the small gears inside. Always flick the switch to MF first.
When to Get Professional Help or a Second Opinion
Camera gear is very fragile. Lenses have tiny gears inside. Sometimes things go wrong. Sometimes the focus ring gets stuck. It feels very hard to turn. You might hear a bad grinding noise. Do not force it to turn. You could snap a plastic gear inside the lens.
If the ring feels stiff, stop right away. If sand gets inside the lens, do not twist it. You will scratch the glass. Take your gear to an authorized repair shop. A pro has the right tools. A pro can clean it out. A pro can fix the small gears safely.
Do not try to open the lens at home. You will let more dust inside. You might break a ribbon cable. Modern lenses are very hard to build. You can check the CIPA camera standards and guidelines to learn how complex modern lenses really are. Always pay a pro to fix a broken lens.

FAQs
What is manual focus in photography?
It is a mode where you take control. You turn a ring on the lens by hand. You do not let the camera guess. You choose the exact sharp spot.
Do pro photographers use this mode?
Yes, they do. Pros use it for video work. They use it for macro bugs. They use it to shoot the night sky. It gives them total control.
Why is my lens ring hard to turn?
Your lens might be set to auto mode. You must flick the switch to MF first. If it is already on MF, it might have sand inside. Do not force it. Take it to a repair shop.
Does this mode save battery life?
Yes, it can save a little bit of power. The camera motor does not have to spin the heavy glass. This uses less juice from the battery.
Can I use this mode for sports?
You can, but it is very hard. Sports move very fast. The players run across the field. Auto mode is much better for fast action.
What is focus peaking?
It is a neat visual tool on new cameras. It highlights sharp edges on your screen with a bright color. It helps you see what is in focus very fast.
Do vintage lenses work on new cameras?
Yes, they do. You just need a cheap adapter ring. Old lenses only use the hand mode. They are fun to use and can save you money.
Conclusion
Learning what is manual focus is a great step. It helps you grow as an artist. Auto mode is fast and smart. But it cannot read your mind. It fails in the dark. It fails on tiny bugs. Taking control fixes these problems.
You just need to flick the switch. Spin the ring slowly. Use the zoom tool on your screen. Stand very still. Take the shot. It takes a little practice. But you will get better fast. Soon, you will take sharp shots in any light. Grab your camera right now. Flick the switch to MF. Try shooting a close object. See how much control you really have!
