

Are your photos coming out too dark, blurry, or washed out? You are not alone. Many new camera buyers get stuck when trying to make sense of camera dials and menus.
Understanding exposure vs aperture is the single best step you can take toward capturing crisp, bright, and stunning photos. Once you know how these two ideas connect, you can easily control how bright your photos look and how sharp your backgrounds appear.
In this guide, I will break down how light works in your camera. You will learn what aperture does, how exposure works as a whole, and how to pick the best gear for your shooting style.
Also See :Best Manual Focus Camera Android: 5 Top Picks
Quick Answer
When comparing exposure vs aperture, remember this: exposure is the total brightness of your final photo, while aperture is the physical opening inside your lens that lets light through. Aperture is just one of three key camera tools used to set your total exposure.
What Is Exposure in Photography?
Exposure is simply how light or dark your photo turns out when you press the shutter button.
When you take a picture, light travels into your lens and hits the camera sensor. If your sensor gets the right amount of light, your shot looks balanced.
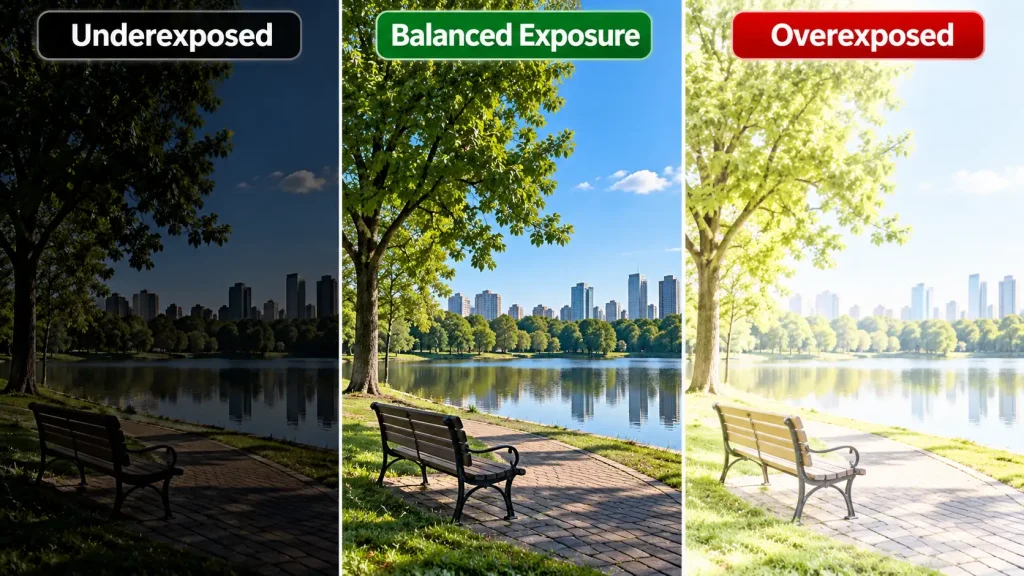
There are three common exposure states in photography:
-
Balanced exposure: The picture looks natural. You can see details in both bright spots and dark shadows.
-
Underexposure: The sensor did not get enough light. The image looks dark, dull, and muddy.
-
Overexposure: The sensor took in way too much light. The bright spots turn solid white, losing fine details completely.
What Is Aperture in a Camera Lens?
Aperture refers to the hole inside your camera lens through which light passes.
Inside the lens, a set of small circular blades opens and closes. When the blades open wide, lots of light rushes into the camera body. When the blades close down, only a tiny beam of light gets through.
Aperture is measured in numbers called f-stops (such as f/1.8, f/4, f/8, or f/16). Here is the golden rule that confuses almost every beginner:
-
Smaller f-numbers (like f/1.8 or f/2.8) mean a larger physical opening. This lets in more light and creates a soft, blurry background.
-
Larger f-numbers (like f/11 or f/16) mean a smaller physical opening. This lets in less light, keeping both the foreground and distant background sharp.
If you want those creamy, soft portrait backgrounds, look for lenses with wide maximum openings. Many photographers check laboratory scores from the DxOMark lens and sensor database to see how sharp a fast prime lens performs at wide settings like f/1.8.
Exposure vs Aperture: What Is the Difference?
To keep it simple: Aperture is a tool; exposure is the end result.
Think of your camera like a room with a window:
-
Aperture is the size of the window. A huge window lets in lots of sunshine. A tiny window lets in very little light.
-
Exposure is how bright the entire room feels once the sun shines inside.
Aperture directly changes your final exposure by making the lens opening wider or narrower. But aperture does not work alone.
The Exposure Triangle: Exposure vs Aperture vs Shutter Speed and ISO
To get a balanced shot, your camera balances three distinct settings. These make up the exposure triangle:
-
Aperture: Controls the size of the lens opening and shapes your depth of field.
-
Shutter Speed: Controls how long the camera sensor stays open to light. Fast speeds freeze action; slow speeds blur motion.
-
ISO: Measures how much your camera amplifies the light signal collected by the sensor.
ISO vs Aperture
When choosing settings, remember that ISO vs aperture changes different parts of your picture quality.
Aperture physically gathers real light through glass. ISO does not gather light; it boosts the signal your sensor captured.
If you use a wide aperture like f/2.8, your lens lets in lots of real light, so your ISO can stay low (like ISO 100). If you shoot in a dark room with a narrow aperture like f/8, you will have to raise your ISO to ISO 3200 or 6400 to keep the shot bright.
However, high ISO numbers add digital noise and grain to your photos. Official guides from the Canon technical resource center point out that keeping your ISO as low as possible preserves the cleanest image details and color tone.
Exposure vs Aperture Chart
Here is a quick reference table showing how changing your aperture shifts your exposure, depth of field, and typical shooting use cases:
| Lens Aperture Setting | Opening Size | Light Gathered (Exposure Impact) | Depth of Field (Background) | Best For |
| f/1.4 – f/2.8 | Very Large | High (Produces brighter shots) | Very Shallow (Very blurry background) | Low-light indoor scenes, portraits, night street shots |
| f/4 – f/5.6 | Medium | Moderate (Balanced light) | Moderate (Soft background blur) | Street photography, casual travel shots, food photos |
| f/8 – f/11 | Small | Low (Requires more light) | Deep (Most of the scene is sharp) | Group portraits, outdoor city views, day landscapes |
| f/16 – f/22 | Very Small | Very Low (Darker shots) | Maximum (Everything is sharp) | Broad landscapes, architecture, long exposures |
Exposure vs Aperture Across Different Cameras
Different cameras give you different levels of control over your aperture and total exposure.
Exposure vs Aperture on Canon, Sony, and Nikon Cameras
On a dedicated DSLR or mirrorless camera, you have complete manual control over the physical lens blades.
If you want simple control, switch your top mode dial to Aperture Priority (marked as Av on Canon or A on Sony and Nikon).
In this mode:
-
You pick the aperture you want.
-
The camera automatically picks the matching shutter speed.
-
Your exposure stays balanced without any guesswork.
Exposure vs Aperture on iPhone and Smartphones
Most smartphones do not have moving mechanical aperture blades inside their main lenses. Instead, your phone lens uses a fixed physical opening (often around f/1.6 or f/1.8).
When you slide the little yellow sun slider up or down in your camera app, you are adjusting exposure compensation, not the physical aperture size.
When you switch to Portrait Mode, your phone uses software and computational depth mapping to blur the background, mimicking the optical look of a fast f/1.8 camera lens.

How to Set Your Camera for the Perfect Exposure in 4 Steps
Follow these easy steps on your camera to get clean, balanced shots every time:
-
Select Aperture Priority Mode: Turn your camera’s main dial to A or Av.
-
Set Your Aperture for the Scene: Pick a low number (like f/2.8) for single subjects with blurry backgrounds, or f/8 for group shots and landscapes.
-
Set Your Base ISO: Set your ISO to 100 or 200 when shooting outdoors in daylight. Turn on Auto ISO if you are moving between sunny and shady spots.
-
Check Your Shutter Speed: Look through your viewfinder. Make sure your shutter speed stays faster than 1/125s for handheld shots. If the number drops lower, your shot might turn out blurry from hand shake.
Expert Tip:
When buying your first upgrade lens, choose a 50mm f/1.8 prime lens. They cost far less than pro zoom lenses, perform great in low light, and let you capture pro-style blurry backgrounds with ease.
What to Look for When Buying Lenses
If you want better exposure control in low light, your lens choice matters more than your camera body. Keep these buying factors in mind:
-
Maximum Aperture Rating: Look for lenses with maximum apertures of f/1.8 or f/2.8. These “fast” lenses let in lots of natural light, saving you from grainy high-ISO photos.
-
Variable vs Fixed Zoom Lenses: Budget kit zoom lenses (like 18-55mm f/3.5-5.6) lose light as you zoom in. Constant-aperture zooms (like a 24-70mm f/2.8) let in the same amount of light throughout the entire zoom range, but they cost more and weigh more.
-
Optical Image Stabilization (IS/OIS/VR): Stabilization lets you shoot at slower shutter speeds without blur, helping you get brighter exposures without wide-aperture lenses.
Common Warning Signs: Lens & Sensor Health
Taking care of your gear ensures your exposure remains clean and free of spots. Watch out for these warning signs:
-
Sticky Aperture Blades: If your lens blades have oil on them, they will close too slowly, causing random, overexposed pictures.
-
Dark Spots in Bright Skies: If you see dark, blurry dots when shooting at f/11 or f/16, your camera sensor has loose dust on it.
-
Lens Fungus or Haze: Web-like marks inside the lens glass scatter light, lowering contrast and making images look hazy. Always store lenses in dry spaces.
-
Rapid Battery Drain: Older batteries lose voltage quickly in cold weather. If your camera shuts down unexpectedly during long exposures, it is time for a new battery.
When to Get Professional Help or a Second Opinion
While you can adjust exposure settings and clean minor outer lens smudges at home, some camera issues need professional service:
-
Cleaning Stuck Sensor Stains: Never scrape or aggressively scrub a camera sensor. If a hand air-blower does not remove dust, take your body to an authorized dealer or camera repair shop.
-
Internal Lens Mold or Fungus: Do not try to take apart a lens barrel at your desk. You risk misaligning the glass elements permanently.
-
Shutter Mechanism Errors: If your camera shows an “Err 20” or shutter warning, the physical shutter curtain may have worn out. Shutter assemblies must be replaced by certified technicians.
Before making any big repair decisions, check the service standards set by groups like the Camera & Imaging Products Association (CIPA) to see if your camera model is still supported with official factory parts.
Common Mistakes Camera Buyers Should Avoid
-
Leaving the camera in Auto mode forever: Full Auto prevents you from choosing the right aperture for creative background blur.
-
Buying an expensive body with a cheap lens: A great lens on a budget camera produces sharper photos than a cheap kit lens on an expensive pro body.
-
Using f/22 for everything outdoors: While f/22 gives deep depth of field, optical diffraction actually softens your fine details. Stick to f/8 or f/11 for the sharpest results.
-
Relying solely on your camera screen for brightness: LCD screens can trick your eyes in bright sunlight. Learn to read your camera’s histogram to verify true exposure balance.
-
Forgetting to reset high ISO settings: If you set your ISO to 6400 for night shots, make sure to reset it to 100 the next morning.
FAQs
What is the main difference between exposure and aperture?
Aperture is the physical opening inside your lens that lets light pass through. Exposure is the overall brightness of your final photo, which is shaped by aperture, shutter speed, and ISO together.
Does a higher aperture mean a brighter photo?
No. A higher f-number (like f/16) means a smaller opening, which lets in less light and makes the image darker. A lower f-number (like f/1.8) creates a wider opening that lets in more light.
Can I adjust aperture on my iPhone?
Most smartphones have fixed lens openings, so you cannot change the mechanical aperture. However, in Portrait Mode, your phone simulates aperture changes using smart software to blur the background.
What is the best aperture setting for portraits?
The best aperture for single-subject portraits is usually between f/1.8 and f/2.8. This setting isolates your subject and creates a soft, pleasing background blur.
Why are my photos dark even when I use a wide aperture?
If your shots are still dark at f/1.8 or f/2.8, your shutter speed may be too fast or your ISO may be set too low for the available room light.
What aperture is best for crisp landscape shots?
For landscape photography, an aperture between f/8 and f/11 is ideal. It keeps the foreground rocks, middle trees, and distant mountains sharp without causing optical softness.
Conclusion
Mastering exposure vs aperture takes the mystery out of manual camera settings. Remember: exposure is the total brightness of your image, while aperture is the physical opening that lets light into your camera while controlling background blur.
Instead of getting overwhelmed by complicated menus, start simple. Set your camera dial to Aperture Priority, choose a wide aperture like f/2.8 for portraits or f/8 for scenes, and watch how quickly your pictures improve.
Take your camera off Auto mode today, head outside, and take five practice shots using different f-numbers to see the difference firsthand!

3 thoughts on “Exposure vs Aperture: The Simple Guide to Better Photos”